<h4>使用同webbench一样简单</h4>
aptitude install siege #安装
siege -c 100 --time=10S http://yjiang.cn/  #使用
siege -c 100 -0time=10S "http://yjiang.cn/login.php POST username=foo&passwd=bar" #post
<h4>详细的测试结果</h4>
<p>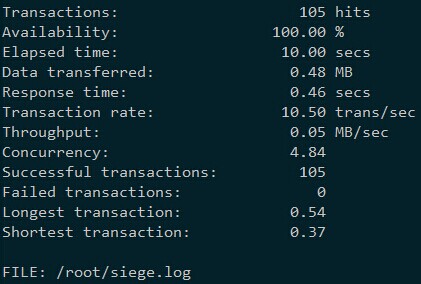 </p>
</p>
<h4>使用同webbench一样简单</h4>
aptitude install siege #安装
siege -c 100 --time=10S http://yjiang.cn/ #使用
siege -c 100 -0time=10S "http://yjiang.cn/login.php POST username=foo&passwd=bar" #post
<h4>详细的测试结果</h4>
<p></p>
pip install ngxtop
ngxtop -l [nginx log file]

实际使用中发现,在访问量非常大的时候,随着日志文件快速增长,会导致大量占用cpu,所以并不适合长时间使用
#连接mongo客户端,执行
db.setProfilingLevel(1)   #开启prifile监控, 0 关闭,1 记录慢命令,2 记录全部
db.getProfilingLevel()    #查看当前监控等级
db.system.profile.find()  #查看监控日志
1. pip install dex
2. 连接mongo shell, 执行` db.setProfilingLevel(1) `开启监控,等待监控几天生成日志
3. 运行 dex -p mongodb://myUser:myPass@myHost:12345/myDb 查看有待优化的字段

--auth参数来启动即可,但是运行在副本集状态下时,与普通模式有点区别:--keyFile;并且增加此参数后将自动启用用户认证;--logpathopenssl rand -base64 580 > mongo_rst.key
chmod mongo_rst.key 300 # key文件权限必须为 x00 ,即用户组及其它无任何权限,例如300
mongod --replSet myrst --dbpath=/opt/mongo/db1/ --port 30001 --keyFile /opt/mongo/mongo_rst.key --bind_ip=127.0.0.1,192.169.0.2 --logpath=/opt/mongo/logs/rst1.log
#!/bin/sh
function command(){
    ###################################
    rst_name=myrst
    port=3000$1
    log_path=/opt/mongo/logs/rst$1.log
    bind_ip=127.0.0.1
    key_file=/opt/mongo/mongo_rst.key
    db_path=/opt/mongo/db$1/
    ###################################
    nohup mongod --replSet $rst_name --dbpath=$db_path --port $port --keyFile=$key_file --bind_ip=$bind_ip --logpath=$log_path > /dev/null 2>&1 &
}
command 1
command 2
command 3
Copyright © 2016 yjiang's cake